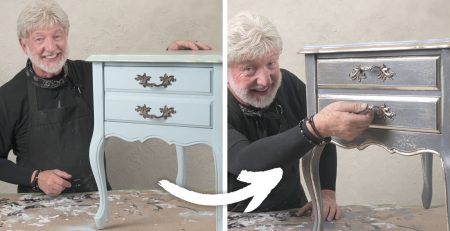
How to use Leaf and Foil Size – Basic Application
The enhanced formula of Artisan Enhancements™ Leaf & Foil Size (aka Gilding Adhesive) provides extended open and tack times. Our Size medium was developed for a smooth, easy-to-use application. Great for a variety of interior projects such as: furniture, cabinetry, decorative arts, ceilings and walls.
Basic Technique Application – Leaf & Foil Size and Simple Metallic Foil Application
Artisan Enhancements™ Leaf & Foil Size can be used with all types of traditional metal leafing or more modern metallic foils. For this tutorial we will be using Metallic Foils. Metallic Foils are a specialized metallic sheeting product for use with Leaf & Foil Size.
Supply List
- Artisan Enhancements™ Leaf & Foil Size
- Flat Chip Brush
- Spritz Bottle (Optional)
- Artisan Enhancements™ Foils in ‘Bright Gold’
- Brushes for sealing
- Soft Cloth or Scrub Brush (polyester or nylon bristle brushes work best with foils. Example: Toothbrushes (soft/medium), household hand scrubbing brush, or manicure brush (soft/flexible).
- Artisan Enhancements™ Clear Finish Gloss or Clear Topcoat Gloss
STEP ONE
Surface Preparation
Surface Preparation. Surfaces should be free of cleaner residue, dust, dirt, and debris. Surfaces should be dry before Leaf & Foil Size application. This technique requires a dry basecoat. For this tutorial we will be using a surface with a darker basecoat for more contrast. Make sure the basecoat of paint/stain is completely dry before application of Leaf & Foil Size. For best results let painted or stained surfaces dry overnight before Leaf & Foil Size application.
STEP TWO
Stir Leaf & Foil Size (Gilding Adhesive)
Stir the Leaf & Foil Size. WARNING- Leaf & Foil Size as it dries becomes very STICKY. If you are using a non-disposable tool to stir, like a spoon or paint palette knife, wash the tool immediately after stirring before the Size dries. Tools will stick to surfaces once the Size dries. Stir from the bottom up before every use – Do not shake. Shaking creates air bubbles in the Size adhesive medium which can be transferred to the surface causing undesired results. If bubbles appear while stirring, allow the bubbles to completely settle before application.
STEP THREE
Application – Leaf & Foil Size
Apply the Leaf & Foil Size. Dip a Flat Chip Brush into the Leaf & Foil Size. Then apply an even, thin coat across the surface using a linear (left to right) stroke. Avoid drips and pools. Leaf & Foil Size will go on “milky” white, but once fully dry should be clear and tacky to touch. Leaf & Foil Size is clear and full tack in approx. 45 minutes. Allow Size to dry before applying foil.
Note: Occasionally, lightly spritzing the painted surface with water first helps make the brushing of Leaf & Foil Size easier. However, spritzing isn’t always required for every Size application and is often just a preference of the painter. If you’re unsure about spritzing first, we recommend doing a test sample piece before applying Size to the surface.
STEP FOUR
Application – Metallic Foil
Apply Metallic Foil. For this tutorial we’re using Artisan Enhancements™ Bright Silver or Bright Gold foils. Our bright metallic foils are very shiny and glossy. The “face” side of the foil will be the shiniest or more glossy side. The more dull and less metallic side is the backside of the foil. Apply the foil to the dry, tacky, Leaf & Foil Size, face side or SHINY SIDE UP. The foil should lay smooth across the surface. Next, using a soft cloth or scrub brush tool and light pressure, rub the foil in linear (left to right) passes. The pressure and friction of rubbing the scrub brush releases and ensures adhesion of the metallic coating to the tacky surface.
Gently peel back the clear film of the foil, revealing the metallic coating transferred to the surface.
Note: If there are patchy missing areas of metallic and the surface is still tacky to touch, repeat step 4 until desired finish is achieved. If there are missing areas and the surface is no longer tacky or an area was missed with Leaf & Foil Size, touch-up repeat step 3 and 4 until desired finish is achieved.
STEP FIVE
Seal
Seal with Artisan Enhancements™ sealers Clear Finish Gloss or Clear Topcoat Gloss. Once Leaf & Foil Size (Gilding Adhesive) has been applied to a surface it remains tacky indefinitely and unprotected if not sealed. For bright and glossy foils, we recommend a “Gloss” sheen for our sealers.
Bonus Tip 1:
The application for matte and simulated dusted foils are the same Step 1 – 4. However, the sealer sheen recommendation changes from gloss to matte. For dusted foils we recommend a “Matte” sheen of our sealers.
Bonus Tip 2:
Our Nature’s Wood Stain, or Scumble may be used over surfaces with Foil applications. To add an additional layer of Nature’s Wood Stain, or Scumble first seal the foiled surface with one thin coat of Clear Topcoat sealer. After 72 hours of dry-time, additional colored waxes/Nature’s Wood Stain/Scumble can be layered over the Clear Topcoat sealed foiled surface.
Thanks for following along <3
To learn more about Leaf and Foil Size (Gilding Adhesive), visit your local Artisan Enhancements retailer, review tip sheets, and visit FAQ section.
Follow Us:
https://www.instagram.com/artisanenhancements
https://www.tiktok.com/@artisanenhancements